Pages

Thursday, 25 June 2015

Baby wipe mini book...

Welcome back to Stamps and Stencils, Ruth here with our next inspiration post and yes it does say baby wipe! I'm sure a lot of crafters will use baby wipes when creating but instead of throwing them all away, do you sometimes dry them and save them thinking that could make a nice background? A lot of mine are just plain grungy and dirty and discarded but sometimes they have possibilities...and in keeping with Julia's current theme I've created a mini book.


So how did I start?


All sorts of colours and all sorts of babywipes, I buy whats on offer so the quality varies.

Sometimes you can see the potential of a lovely background. I posted this one on my blog a while back, I used a JOFY set because they are quite an open stamp and coloured in with promarkers...carefully


So for this post I looked for another suitable background and found this one which I've again used JOFY stamps on.


I've turned it into a journal page which I stitched onto some photocopy paper, to give it some stability.


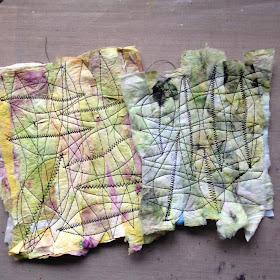
So with the 'fluffier' ones, I've stamped and stencilled and then ripped and layered!


I then stitched, randomly to secure the loose pieces. If you didn't want to do this you could use a spray adhesive and faux stitched stamping.


Once I started using the sewing machine I couldn't stop, wonky stitching which I excel at is perfect for this! 


I became more confident and thought these colours would be good for leaves so having sewed wavy lines one way, I stitched rough leaf shapes the other.


So this is my haul of ready made embellishments. You'll notice some hearts in there which is really where the inspiration for the post came from. It was our wedding anniversary a few weeks ago and I was looking around the craft room for inspiration and my eyes landed on the used baby wipes, so I created 2 baby wipe hearts and thought maybe I should explore this idea more.


Above is the original card and below I've added some more colour to the hearts I made this time around.


Having promised last time that this would be a quick post, I'm failing so I'd better get to the mini album.


There were 2 large leaves that were almost the same size. I cut 10 pieces of cotton paper in the same leaf shape. Cotton paper is a bit more sturdy.


On each leaf I used peeled paint and blue violet archival with various stamps and stencils. I then picked out some phrases to go on each one and embossed them in gold. You'll notice the back of the leaf cover is a lovely blue which is another bonus.


On the reverse of each page I used peeled paint and dusty concord through an Emma Godfrey stencil. It adds a little bit of colour but will also allow me to do some mini journalling if I want to.

Hope you enjoyed this inspiration post and if your wondering what I've made with the rest of my embellishments I'll be posting some cards on my blog later this week.

Don't forget you've got just under a week to join in with our current 'small is beautiful' challenge.

Thursday, 18 June 2015

Welcome to today's Guest Designer, Amanda !

Hello and welcome! Today we are welcoming Amanda of Treasured Moments of Inspiration as our Guest Designer. Amanda was the winner of the Three of a Kind challenge and was asked to join us as Guest Designer. So, let's move on to hear from Amanda !

Hi everyone, Amanda here and I am delighted to be here following my win of last month’s challenge
I am a “Craftaholic”! I have been crafting for about 6 years now and love nothing more than escaping into my craftroom to just get all inky and messy. My style is continually evolving and I love trying new techniques and products and create, in my opinion, many “Happy Accidents”! I suppose I would class myself as a mixed media crafter but also like creating within many other genres it just depends what crafty mood I am in. I also do like to collect the odd stamp or two, an obsession that I am considering seeking medical attention for, but I think I am beyond help!!


For this month’s challenge “Small is Beautiful” I have created “The Little Book of the Sea” which is housed inside a small matchbox.


Here’s how I made it:-
I first started by die cutting my matchbox using Tim Holtz Alterations matchbox die, for this I used a heavy kraft card.
Then to make my little book to put inside. The inside measurement of the box is 4.5cms x 6.5cms so to ensure that my little book fitted, it needed to be 4cm x 6cms when finished.
I cut a piece of A4 white card into a 6cm strip and then scored at 4cm intervals.


I then prepared my background. The first layer was a layer of blue brusho, I then stencilled the bubbles over using first PaperArtsy Fresco paint in white and then bump stencilled again with shades of blue Fresco paint. When that was all totally dried I applied Antique Linen Distress Ink with an ink blending tool.

 
 I then added some background stamping using blue Archival ink.


Then to add my images. I stamped a selection of sea themed stamps, from Crafty Individuals and Chocolate Baroque, onto white paper using Potting Soil Archival ink and set about cutting them all out.
 

Then to create the pages. You will notice the last page is blank, that is because when folded up it sits under the cover to complete the book.


A layer of white fresco paint roughly applied, same stencil technique as above. Then I added some bandage, to mimic fishing net, that I had coloured with the watered down Fresco paints and Vintage Photo Distress Stain and some of my left over cut outs. 


Text has been typed out on my vintage typewriter and applied with 3D glue gel. I even added to the inside of the box for the book to sit in.


I hope you like it.
Love
Amanda X

Fantastic Amanda ! What a beautiful little book and housed in such a gorgeous match box home. There's still plenty of time to join us for the current challenge of Small is Beautiful and I'm sure that Amanda's project has give you even more inspiration. 

Thursday, 11 June 2015

Journalling with Frescos !

Hello and welcome to today's Inspirational Post ! It's Sue here with you today, when I sat down to create something for this post Mr Mojo flew straight out of the window ! I read on Dina Wakley's blog recently that when this happens the best thing to do is just do 'something'. Leandra from PaperArtsy was demoing the brayering technique on Sunday at The Stamp Magic show, so with this in my head I picked up my brayer and away I went !


I started by taping the centre of the pages with masking tape and giving the pages a coat of Gesso. I used neutral tones to begin with of Fresco Finish acrylic paints and brayered them on to the pages. The journal is made with watercolour paper so the pages have texture which gives the appearance of canvas when you start to paint on it.


Following on from the neutral tones I started to add some colour, moving the book around and brayering from all edges.


Using Snowflake Fresco Finish I knocked the colours back a little, not brayering over the entire pages but in patches.


 Thinking that it still needed something I used Autumn Fire Fresco Finish around the edges.


I demoed a technique on Sunday at the Stamp Magic show on the PaperArtsy stand where bright colours are stencilled over white. I love this technique so decided to indulge myself ! Using Snowflake Fresco Finish I stencilled some flowers over the pages. This blocks out the colours below and allows you to use translucent paints on top.


 First colour I chose was Blood Orange and replaced the stencil over the white and stencilled again.


Another technique I love is the 'bumping' technique, I replaced the stencil but then moved it slightly down and stencilled over the flower with Snowflake.


I started to build the colours up on top of the white layer, using Yellow Submarine, Tango and Brown Shed Fresco Finish paints, keeping the darker colours towards the centre of the flowers.


For extra definition I used Claret Fresco Finish in the centres.


I thought I was happy with the flowers at this stage so I then started to stamp across the bottom using Darcy Wilkinson's stamps and I've painted them with Limelight and Hey Pesto Fresco Finish paints. I added a little Yellow Submarine to the larger leaves and stamped the little dots using Leaf Green Archival ink.


I changed my mind about the flowers and thought about a technique that Lin Brown shared recently. I used Grunge Paste with the PaperArsty dotty stencil and dabbed mica powder on top of the dots. You can't really see in this photo but the mica powder does add a sheen.


The wonderful sentiment is from one of the Sara Naumann stamp sets. I've also added some doodling with a white Sharpie pen.


The little tag is stamped onto some brayerd card and I've stamped the word Bloom in the centre. Before I stuck it down I used a Gelato from the Steam Punk set and created a shadow. The beauty of Gelatos is if you have used too much you can wipe some away with a baby wipe as they react with water.


If you've stuck it out to the end, here is the finished page !

I hope you've enjoyed today's Inspirational Post and remember you've still got lots of time to join in with the current challenge of Small is Beautiful.

Sue
x


Tuesday, 9 June 2015

Winner and top 3 - Three of a kind

Hello and welcome ! Today we're announcing the winner and top 3 of the Three of a Kind challenge. The entries were absolutely fabulous and it made the job of the DT so hard ! But, as always we got there in the end, so without further ado congratulations go to:


Congratulations Amanda ! 

Your project is fabulous and we loved the depth you've achieved and the contrast between the bright colours. As the chosen winner Amanda  has been invited to Guest Design for Stamps and Stencils at a future date. 

We also have a further winner of the beautiful palette knife from Toni chosen by RandomOrg. So, congratulations also go to:


Congratulations Shilpa!

Shilpa please email carringtons22@yahoo.co.uk with your mailing details.

Now on to the top 3


Congratulations everyone, please email carringtons22@yahoo.co.uk for your top 3 badge. 
All of the winners will also be pinned on the Stamps and Stencils Pinterest Board too ! 
The current challenge is Small is Beautiful and you've still got plenty of time to join in. 
Sue


Thursday, 4 June 2015

Small Is Beautiful

Hi everyone. Julia here to host June's challenge. Firstly, can I say a huge thank you for all your wonderful entries last month in our Three Of A Kind challenge. It will be a difficult job to choose our winners! Don't forget to check back on Tuesday 9th June to see who our winner is and the top three too.

For this month's challenge you are asked to make or alter something small. This could be a tiny book or journal, an ATC or ATB, a small canvas or box/tin of similar size, a small piece of jewellery - anything, as long as it is small.You must use at least one stamp and one stencil on your project. Please remember we are a mixed media challenge blog and the style of your work should reflect this.

Now let me show you some wonderful inspiration from my hugely talented teamies: 


Julia


Sue

Toni


What amazing work from my fabulous DT friends! I do hope you feel inspired to make or alter something small for us. Just remember to add in at least one stamp and stencil and then link up with us using the linky below.
It's over to you now - can't wait to see what you come up with that's small and beautiful!
Julia x