Pages

Thursday, 31 March 2016

Junk Journals!

Hi everyone, Ruth here with this weeks inspiration post which is very loosely linked to our current theme of Spring is in the Air. For some reason Spring made me think of Spring cleaning, yes I know I've just lost half of you there but please bear with me! I'm always trying out techniques or create more pieces of art or embellishments than I really use and gradually the drawer I use to store these experiments in was full to bursting. I've been wanting to make a junk journal for a while now so thought I'd do some 'spring cleaning' to clear some space and make something useful at the same time.


When I started looking at what constitutes a junk journal, well it seems that almost anything goes and it's probably easier to say what it's not, so I thought I'd start by including links to some fab inspirational junk journal ideas found on pinterest but put the link to the original source. As you'll see many of these ideas have been around for a while but are still a great source of inspiration.

The first is made by Sarah just using envelopes, and is so effective. The second is a journal by Kate Crane and shows her using book text on the back of her pieces ( an idea I've used in mine). Next is a video by Shannon Green using an old book to create the journal covers and lastly lots of ideas on this site of Jackie and Michelle's. 

So this is the starting place, the drawer....and a box of smaller pieces, yes it had spread by the time I got around to it! 


When I'm overwhelmed with where to start, I find it really helpful to limit my choices so I reduced the colour palette and limited myself to using what was there, so I didn't create even more pieces. The base pages were about A5 size or trimmed to fit.

  
 I also allowed myself to use book text, 2 stamps (text and sequin waste) and the brayered paint techniques to alter the colours or put a base on the flip side of a page. At first this was challenging but  so, so rewarding; to create something out of 'junk', pieces that you couldn't quite throw away but couldn't really put on a card. So much so that I became obsessed with completing the whole 20 page journal.


To start I cut some grey board for the covers and as I don't have a cinch or bind-it-all, used some book rings. The journal holds 20 pages and I've already ordered some larger book rings to use as I add to it. The card was a real mish mash of types, none that I would use if journalling, but as I wasn't adding product, it wasn't a problem.


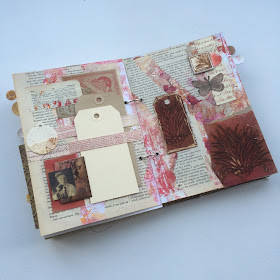
The inside cover and first page altered with book text and scraps. I have to recommend Tims' tiny tags and tabs die, as you'll note I decided to take it down the tags and pockets route and this die was indispensable. What made all the difference was sticking to certain colours for each page, as long as the colour was ok, it really didn't matter what you were adding.


A few details, the little booklet, was one I made out of a sheet of paper a while ago but then never did anything with...ideal!


The pages grow quite quickly. Another before shot.


 Anyone still have K& Co paper? I'd cut these flowers out years ago and never got around to using them, now or never then.


A few more pages.


A spring themed one. Another lovely part of making this is that it reminds you of other projects where you were testing out before the final piece. 


Lots of stamping and stencilling included in this journal anyway, these were gelli print backgrounds on some odd yellow paper I had!

.

Sometimes the pages can be simple, no tags on this one but room to journal. Bistre backgrounds on cartridge paper and the regular followers may recognise the feathers from a previous challenge theme, 


Some of my favourite pages started off totally different and went through many changes. 


And some didn't, at the moment this is my favourite and quite quick and simple. Now I'm not going to show every page as you'll lose the will to live, so I'll post the remainder on my blog over the next week. 

To finish though I'll just mention the cover. I used fibre paste which gave a lovely flexibility to the cover. Lots of fresco paints and some stencilling and finally some calico craft parts which I have been hoarding but after some UTEE addition and a little treasure gold they seemed to look the part.


I hope this has provided a little inspiration to either use something you've been hoarding or some scraps on a project or maybe even your own style junk journal. And remember there's still another week to join in with our challenge. Ruth x

Thursday, 24 March 2016

Welcome to today's Guest Designer, Mar !

Today we are welcoming Mar of Margik Art as our Guest Designer. Mar was chosen by the DT as the winner of the Oh So Blue challenge and was therefore invited to join us as Guest Designer.  So, let's move on to hear from Mar  ! 


Hello, I am Mar also known as Margik in blogland, and I am from Spain. I enjoy spending time creating mixed media projects, art journaling, scrapbook mini-albums, altered projects, and I also love painting and drawing. I like to try different things all the time, and I am always looking for new techniques. I really enjoy all types of arts. I started my blog at the end of 2013 to enter challenges and it’s definitely a pleasure to share.

I am delighted and so honored to be a Guest Designer here at fabulous Stamps and Stencils blog. Thanks so much to Sue and the talented team for this opportunity.

For this wonderful ‘Spring is in the Air’ challenge, I created a 20x20 cm (8 x 8 in) canvas using several mixed media techniques, and I have to tell you that I really enjoyed this theme. 


I started by coating the canvas with white gesso and then added a mixture of gel medium matte and Golden Pumice Gel with a palette knife in the center, in order to make an opening to sink the flower stem. After it was completely dry, I applied a new layer of texture paste through a brick wall stencil over the top.


Here is a close up of the brick wall.


Next, I added randomly heavy texture paste with a TH stencil with my palette knife.


At this point, I added some gel medium mixed with Distress Glitter on the edges and the sides of the canvas to create a coherent feel.


Next, I stamped these beautiful flowers (TH flower garden set) with black Archival Ink on watercolour paper and coloured them with -abandoned coral- Distress ink and spray, I then cut out them to add to the background.


Here is how my flowers turned out.


I coloured the background of my canvas with Distress inks and added a few random splatters of Abandoned Coral colour. To finish off, I added a small butterfly and the Spring word on the bottom.


And here is my finished canvas.

Thanks again Sue for inviting me, and I hope you enjoy my project!

I'm sure you'll all agree that Mar's canvas has a beautiful Spring feel about it and has provided even more inspiration for the current challenge, Spring is in the Air !


Thursday, 17 March 2016

Anyone For a Cup of Tea

Hi everybody! It's Toni here and it's my turn to put together another one of our Inspirational Posts. Rather than showcasing a particular product or technique, I've decided to show you how I went about altering this cup and saucer. It also fits in rather well, with our current 'Spring is In The Air' challenge. So grab a cuppa' and I'll get started.....
I've got a few china cups and saucers that are very pretty but in our household, pretty useless, as we are all confirmed mug users. I thought it was time to experiment, this is my cup and saucer before I set to......
I've not altered any glazed china before, but my crafting instincts told me to firstly give it a coat of matte medium. Once this was dry, I collaged the surface of both the cup and saucer with torn up sheet music paper using more matte medium ......
I then painted over the surface with  Antique Linen Distress Paint, not too thickly, as I wanted the music to show through.... no photo as this is the stage where I started to get engrossed !
Whilst the cup and saucer were drying, I stamped out some images on tissue, using black Versa Mark Ink. Most of the stamps I used are from an Indigo Blu set called Live, Laugh, Love. I think these are amongst my most inked stamps. I used the same set for my project for our current challenge.
I also stenciled this group of words with Wendy Vecchi's Gold Embossing Paste, onto a piece of deli paper. This embossing paste is wonderfully gold when dry, you wouldn't realise it when you see it in the jar, but it dries to a really shiny finish. I cut around several of the images and tried out a few placements, working on the saucer first. Once I'd got an idea of what I wanted I used matte medium to attach the tissue images to the surface. Carefully smoothing the tissue using a dabbing motion with soft brush .... quite a sticky process hence the lack of photos! I applied the cut out words in the way. Once every thing was dry, I did a little light tinting of the images with Wendy Vecchi Archival inks.I also painted the handle of the cup using a gold leaf pen.
I then gave everything a  coat of Deco Art Ultra Matte Varnish in order to seal the surface before applying Deco Art Crackle Glaze. To enhance the crackles I used black Antiquing fluid and buffed the surface with a soft cloth.
I used the gold leaf pen to highlight the rim of the cup and saucer.
As you can see, lots of lovely little crackles !My finishing touch was to construct the nest and make the little eggs. A trip into the garden supplied me with some dead grasses and leaves which I swirled together. I used more matte medium to hold the nest together. The faux moss is something I bought a while ago from Hobby Craft.
I made the eggs with Silk Clay and painted them with Distress Paints. I added a little word token to the edge to complete my alteration. I know I always say this, but this was a lot of fun to do and I'm really pleased with my 'Spring Is In the Air'  altered cup and saucer. I hope this may inspire you to have a go at altering some crockery, I'd love to see it if you do ....and don't forget our 'Spring Is In The Air' challenge is open and awaiting your project ! x

Thursday, 10 March 2016

Playing with brushos and distress crayons

Good Morning all! Rachel here today to share a Spring themed post using some lovely Paperartsy stamps and also brushos and the lovely new distress crayons from Tim Holtz. I hope you will be inspired by my work and do some playing yourself!


I started off with an a4 piece of water colour card, archival ink, stamps, distress crayons and brushos.


I started by stamping the images in archival ink on the water colour card.


Next I sprinkled yellow, leaf green and emerald green brushos on the bottom area of the page and spritzed with water.


This is the result once dried. next I repeated the process in the top of the page using turquoise and ultra-marine. Again I spritzed and dried.


This is what the page looked like then - next I added some colour to the flowers using distress crayons - I added the colour to the small parts of the flower then used a wet brush to drag the colour around.


The flower at the bottom has had the colour dragged whereas the top flower hasn't. 


I added green distress crayon to the stalks.


A yellow crayon was added to these flowers and the colour dragged with a wet brush.


This is the final page with all the elements coloured with the distress crayons - I think they work really well with the brushos - what do you think?

I hope this has given you a few ideas about the new distress crayons and also brushos.

Big hugs and thanks for your company!

Why not join us for this months challenge which is Spring is in the Air!

Hugs

Rachel x


Tuesday, 8 March 2016

Winners - Splatter Spritz and smoosh !

Hello everyone, we're back today to share who the winner and top 3 are for the Splatter, Spritz and Smoosh challenge. Well all I can say is this obviously hit the bullseye as we were blown away by all the splattering, spritzing and smooshing ! The DT's job, yet again, was really tough but as always we got there in the end. So without further ado, the winner is .........


We loved the splattering and spritzing on Alison's wonderful project! Alison please email carringtons22@yahoo.co.uk for details of your Guest Designer spot and winners badge.

Now on to the top 3:


 Coco


Congratulations everyone, please email carringtons22@yahoo.co.uk for your top 3 badge. 
All of the winners will also be pinned on the Stamps and Stencils Pinterest Board! 
 
The current challenge is Spring is in the air ! and you've still got plenty of time to share your Spring projects with us.


Thursday, 3 March 2016

Spring is in the Air!

Good Morning all and welcome to a new challenge here at Stamps and Stencils. Rachel is your host for this month and the theme I have chosen is all about Spring. This has to be my favourite time of year - hopefully we wave goodbye to winter weather and start to see a burst of colour all around us - flowers start to bloom and birds and bees get busy doing their thing! For me it is a time of hope and new life. But what about you? What does spring mean to you? Thats what I would like to see in your entry to this months challenge - oh and of course please use some stamps and stencils and remember we are a mixed media blog.

Here's some inspiration from the design team:


So now it's over to you ! We're looking forward to seeing your Spring projects !