Pages

Thursday, 30 March 2017

Mixing it with Metal

Hello and welcome to today's Inspirational Post. It's Sue here and today I'm sharing a revamp of an old project where I've indulged my passion for working with metal. Ever since I was introduced to metal in my art many years ago at an Artsycrafts weekend, that PaperArtsy used to arrange, I've been hooked. I love the dimension and texture that metal gives your projects and coupled with Fresco Finish paints I'm in heaven ! So today is all about my indulgence, so I apologise upfront !


 This is what the project looked like before I started work. First thing to do was to take off all of the embellishments and then sand it all over.


I originally was going to sand the stencilled Grunge Paste off but I do have a soft spot for swirls and flourishes so decided to keep them. 


 I have some sheets of Ten Seconds Studio metal, which is running out fast, and used some moulds to create different textured pieces. I placed them on the mirror to start the thought process going. 


 I grabbed a few Fresco Finish paints and added some satin glaze and using my finger blended the colours all over the wood.


 After finalising the metal layout it was all stuck down with extra strong double sided sticky sheets.


 To tie the metal into the colour scheme I used Brown Shed Fresco Finish over the metal and wiped it off before it dried.


 I also used Dusty Teal and some Little Black Dress to distress the metal some more. Now I needed to decide whether to keep the mirror in the centre or do something else.....


 I wanted to fill the niche so started by painting the mirror with Little Black Dress Fresco Finish paint. 


 I'd been watching some videos by Nancy Crawford on Encaustic Art so thought a small piece in the centre might be the way to go. I didn't have the right size of Stamp Bord so glued together the smaller square pieces then gave it 3 layers of encaustic medium.


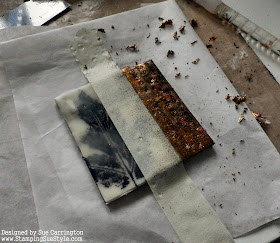
I stamped the leaf from one of Lin Brown's new stamp sets onto tissue paper then fused it onto the board.


 I was originally going to try and do 3 vertical black lines on the right hand side of the board but things went slightly wrong ! So, I used masking tape then rubbed gold leaf over the wax rubbing with my finger so the leaf sticks to the wax.


 This is the finished piece, I think ! The colours didn't come out how I wanted them so I may need to work on it some more but for the moment I like it. 


One final shot to show the texture of the metal and how the encaustic piece sits in the centre.

I hope you've enjoyed today's Inspirational Post, no birds today but hopefully lots of inspiration !

Sue
x

Thursday, 23 March 2017

Art Journaling with Inktense Blocks


Hello, everyone!

Branka here and today is my turn to bring you an Inspirational post.

I would like to show you how to create an art journal spread using only Derwent Inktense blocks, in less than 30 minutes. It's quick, easy and fun.

Let me say a few words about Inktense blocks.
These vibrant chunky water-soluble ink blocks can be used dry or mixed with water which will transform into truly inspiring ink-link paint.
The chunky shape makes them extremely versatile and making it easy to cover large areas really quickly. Once dry the color is permanent and can be worked over the top of. The blocks can be used on fabric, too (silk and cotton).
The full set contains 72 blocks.


All you need for this project is an art journal (I am using my Dylusions small one), clean water, a brush (I am using a watercolor flat 3/4 brush), something to protect your working surface, stamps and stencils (I am using Dina Wakley stamps and stencils here), Black Archival ink, some paper scraps, some washi tape and Inktense blocks.
So, let's start!
Pick the blocks in colors you like and apply them randomly onto your pages. I wanted to achieve a kind of a Dina's style look so I decided to leave some white spaces.  


Use your wet brush to activate the ink.


You can use these blocks like you would use your watercolor pans. Dip the brush into the clean water and pick the color directly from the block. That is what I did here to create some patterns using my stencil. I used my brush to apply the ink through the stencil because I wanted to achieve a watercolor look but you can use a cosmetic sponge if you want.


I added some paper scraps and applied some white gesso on top to blend them together with my background. 


You can play with your washi tapes to create more texture.


I stamped my birds using my Dina Wakley stamp set and my Archival ink in black. I used my dry Inktense blocks to add more color onto the birds. As you can see, I wasn't neat :)
I stamped the quote onto some white tissue paper, cut it in stripes and glued down onto my page.  

Here is the finished vibrant art journal spread.


I hope I have inpired you to create your mixed media piece using some stamps or stencils or both and to join in our Chirpy, Chirpy, Cheep, Cheep! challenge here at Stamps and Stencils.

Hugs! Branka xx


Thursday, 16 March 2017

Guest Designer - Ioulia


Hello, I am Ioulia (julD handmade) from Greece and I am so happy to be once again a Guest Designer at Stamps and Stencils. It is such an honor to be here today. Thank you so much..

I loved painting and crafting from my early years, but instead of becoming an artist I became an engineer who loves to create things in her free time. So, crafting is my hobby. My favourites are clay and texture in paintings. I am impressed by new techniques and altered materials.

The challenge theme for this month is “Chirpy, Chirpy, Cheep, Cheep – Put A Bird On It!”. I created a mixed media painting with a girl and three birds on her head.


I used a wooden tray which I coloured with diluted acrylic paints.


For the background, I used distilled brown paint and white gesso with a stencil.


Then, I stamped with several stamps and acrylic paints or archival ink.


I painted a girl with acrylics and I used a paste with spatula for her hair.


Her dress is a scrapbooking paper and the lace is made with gesso and a mold.


The birds are a collage from an old book and are painted with watercolours and gesso.


I hope you like it. You are very welcome to stop by my blog to see a few more close ups.
Thanks again for inviting me to be a guest designer this month.

Thursday, 9 March 2017

More play with distress oxides

Hello there! Well I really loved Autumns tutorial on using distress oxides - so much so I decided to have another play and show the results here! I used them in a few different ways to make up my journal pages which I will explain as I go along!!! Here's the finished page for starters!


I love the muted tones the oxides produce....they are so different from distress inks and yet so similar too - very clever stuff I think!

Here's what I did to achieve this page....


My first move was to use my craft mat - I added dabs of four colours to the mat - cracked pistachio, fossilised amber, faded jeans and broken china, spittzed with water and then literally wiped the mat onto my journal pages. I repeated this until the pages were covered.


Next I mixed a dab of cracked pistachio distress oxide with wendy vecchi crackle paste and mixed thoroughly.


I used a clarity stencil and added the colured paste through.


Here's a close up that shows the dried crackle paste.


Next I stamped directly onto the page using indigoblu stamps and distress oxides.


here's what the page looked like.


Then I again added the distress oxides to a craft mat and used my waterbrush to pick up the colour and paint the images.

The last things I did was a little further stamping and adding the grass by painting with the water brush.

They really are a great product - I hope you have enjoyed seeing how I have used them - simple but fun and results different from distress inks.

Hugs

Rachel s

Tuesday, 7 March 2017

Winners - Texture, Crackle and Paint !

Hello ! Welcome back, today is the day to share the winner and top 3 for the Texture, Crackle and Paint challenge. As usual this proved really difficult for the team to choose, so many wonderful entries !

So, please give your congratulations to ....


 Congratulations ! We thought the detail and colours just fabulous !  Please contact carringtons22@yahoo.co.uk for the details of your Guest Designer spot. 

Now on to the top 3:


Congratulations everyone ! Please email carringtons22@yahoo.co.uk for your top 3 badge. 
All of the winners will also be pinned on the Stamps and Stencils Pinterest Board! 
 
The current challenge is Chirpy, Chirpy, Cheep, Cheep  and you've still got plenty of time to share your projects with us.


Thursday, 2 March 2017

Chirpy, Chirpy, Cheep, Cheep !

Hi everybody! It's Toni here, I find that one of the joys, at this time of year, is to wake up to the glorious sound of birdsong. The challenge this month is in celebration of our fine, feathered, friends. We would love to see your mixed media projects, that include at least one bird. Whether it's a  journal spread, an assemblage or card, just make sure that a little dickie bird or birds, feature somewhere.

Please don't forget to include stamping, or stenciling or even both! Can't wait to see your creations!


So now it's over to you !