Pages

Thursday, 29 March 2018

Inspiration Post - Feather Collage


It is Cec here and I am bringing you the inspiration post today and in keeping with the current challenge, Wax Lyrical, I am including some wax on my project.  I have created a little collage and here is how it came together.


I started with a 6"x6" canvas (Above Ground) and gave it a coat of white gesso (Liquitex).


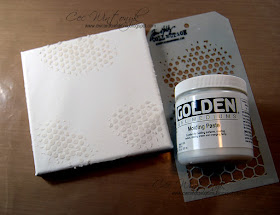
Next I added some stenciling with Molding Paste (Golden) through a Bubble stencil (Tim Holtz).

I forgot to take a photo but the next step was to paint the canvas with Khaki Acrylic Paint (Craftsmart) and then spray it with Gathered Twigs Distress Spray Stain (Tim Holtz).


Once the canvas was dry I added some Vintage Photo Distress Ink (Tim Holtz) to the raised areas and the edges of the canvas.  Now it was time to prepare all the collage elements.


Using Jet Black Archival Ink (Ranger), I stamped a feather (Inkadinkadoo) onto a torn scrap of buff coloured card stock.


Once it was stamped I crumpled it up a bit and smoothed it back out and then inked all over with Tree Branch Archival Ink (Wendy Vecchi) making sure to highlight the creases.


Next I shaved a bit of beeswax (ArtMinds) with a cheap grater from the dollar store into a tin cupcake tin and heated it on top of a portable element.  The beeswax was painted on the feather piece and then I used my heat gun to smooth out the streaks.

Here are a few tips from my experience working with the beeswax:
  • Make sure you are in a well ventilated room (I just opened the window of my studio).
  • Use an old paintbrush that you don't mind dedicating to wax because some wax will stay in it when it dries but it can be used with wax again - it will melt once you add it to hot wax.
  • Work quickly because the wax dries very fast.
  • Use a heat gun to smooth out the streaks left by the paint brush.
  • Try not to manipulate your piece after you have finished heating it because once it is dry, the wax can crack - learned this from experience when I tried to distress the edges a bit more.
  • Use archival ink because distress ink may bleed when you add the hot wax - I didn't test it so it is just my assumption.


I changed the colour of a piece of crochet lace from my stash by dragging it through some watered down Vintage Photo Distress Ink (Tim Holtz) and then giving it a few sprays of Burnished Brass Moonshadow Mist (Lindy's),


Using some Crafter's Clay (Martha Stewart) and once of her silicone moulds, I created a little medallion and once it was dry I painted it with Worn Penny Metallic Acrylic Paint (DecoArt).

I created the sentiment on the computer, inked it with Vintage Photo Distress Ink (Tim Holtz) and added a brad (Making Memories) to one corner.  The heart was in my stash and was hand cut, inked with Vintage Photo DI and then had some stenciling added with Tree Branch Archival Ink through a Splatter stencil (Tim Holtz).

To assemble the collage, I added a torn piece of natural paper from my stash and topped it with the lace and then the feather panel.  some copper wire from my husband was wrapped around a stick and added to the top.  A rusty washer and the sentiment were added in the right side and then some fibres (EK Success) with the heart and medallion were added on the left side.  I used a soft gel medium (Golden) as an adhesive for all my elements.

I don't know how the wax will behave if I use it to embed items on a collage but stay tuned because I am going to give it a try.  With a 50% off coupon from Michaels, this was a much more affordable alternative to encaustic wax.

I hope you like my little collage with beeswax and will give it a go yourself.

Thursday, 22 March 2018

Welcome to today's Guest Designer, Helen !

Today we are welcoming Helen Liu of Happy Stamping and Happy Life as our Guest Designer. Helen was the chosen winner of the On the Bright Side challenge. Let's move on to hear from Helen:


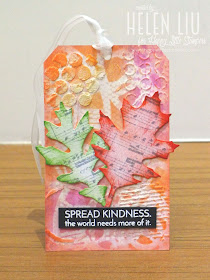
I’d like to thank the Stamps and Stencils DT for inviting me. I am thrilled and absolutely honoured. My name is Helen Liu. I live in Taipei, Taiwan and work full-time as a Banker in a Commercial Bank. I enjoy making cards/tags in my leisure time as it eases my work tension and balances my life. 
We asked Helen a few questions to get to know her a little better and find our more about her crafting: 

1.How long have you been crafting for ?

I started my stamping journey about 12 years ago. Wow!

2.What or who inspired you to start crafting ?

My crafting journey began with a few stamps and inkpads I bought for my daughter as her 5-year birthday gift. I then played with her and gradually fell in love with this hobby.

3.What is your favourite technique?

Stenciling with all kinds of Distress products and Mixed Media are my favorite technique. 


4.What excites you most about crafting?

The WOWs I get from my card recipients or whoever sees my artworks really make me thrilled.

5.What is your 'go to' product and why?

I have been addicted to stencils in recent years. Stencils are inexpensive and can be used to build layers with inks, paints and pastes, to create emboss effect like embossing folder, to doodle, to serve as stamps or even to play resist techniques. You can use stencils to create sophisticated Mixed Media projects or Clean & Simple cards. The possibilities are endless. 


6.Who would you most like to take a class with?

I love to take on-line classes alone due to time consideration and flexibility. I’ve taken Online Card Classes run by Jennifer McGuire and Kristina Werner, and also some Mixed Media classes taught by Shari Carroll, Marjie Kemper, Vicky Papaioannou via Craftsy.

7.What's your favourite style of crafting i.e. journalling, altered items etc.. ?

I like to make cards and tags. I like elegant images and colorful palette. And I am addicted to play techniques. If I have to name a favorite style, that would be feminine, multicolored and technique-driven. 


8.Where do you find inspiration?

I find inspirations from blog challenge themes and some blogs that I follow, including Stamps and Stencils.

Thank you so much Helen for sharing more about yourself and your crafting and also the 3 fabulous projects.

There's still time to join in with the current challenge Wax Lyrical.

Thursday, 15 March 2018

Inspiration Post - Be Brave

Hi everyone, Lula here with my first inspiration post!
I decided to encourage you a bit to join us in our current challenge Wax Lyrical.
Although I am not an expert in this field I would like to show you that anyone could play with wax, even not having special, fancy tools!
I can guarantee you great fun!


I have prepared a male card where I used wax seal refills ( the one and only wax I could buy here) in silver and gold, to make a background.


Using my heat tool I started by melting the wax on gessoed piece of cardboard.


Here you can see a coat of  wax and some dripping added.

Unfortunately the whole piece started to crack...


so I gave it a coat of Deco Art crackle glaze to emphasize the effect.


I stamped some images on tissue paper and glued them with gel medium to the background.


I finish my piece off adding more stamping and some metal elements. 

I hope this inspires you to have a go at playing with wax


There is still time for you to enter our current challenge.....


Thursday, 8 March 2018

Adventures with 'Fabric' Paper.


Hi everybody ! It's Toni here and I've got the pleasure of sharing one of our Inspirational Posts with you and I've chosen to have a little play with 'fabric' paper. There are various methods of making fabric paper and the one I've chosen uses ordinary brown wrapping paper. I chose three types of paper, good quality, cheap 'Poundland 'quality and the type that comes as filler in packaging......
The first thing to do is to screw up the paper. Brown paper is apparently made with cloth. Screwing it up helps to soften the fibres and starts to give it a more fabric-like feel. I then opened out each piece and splodged on some cheap acrylic paints using three colours on each sheet
 This is what I ended up with....
There didn't seem to be much difference between the way the different qualities paper responded. I dried out the sheets of paper and screwed them up again. It's important to dry them out as the papers are more prone to breaking up if they are handled roughly when wet. I then took each piece of paper and smoothed it out before  and stencilling over the surface with metallic paints. The ones I used here are Starlights by Imagination Crafts, they are wonderfully sparkly.
and.......
Once the stencilling was dry, I screwed up the paper again, and then opened it out and swiped a black Archival Inkpad across the raised areas. I dried this with a heat gun. I then smoothed a little metallic wax onto the grey side of a piece of Cut and Dry Foam. I screwed up the paper again nd this time when I opened it up I gently swiped the raised areas with the metallic wax. Here's a closeup........
I was quite amazed how strong each of the papers were. I added a bit more stencilling here and there and and also tried swiping the surface with Versa Mark Ink and adding embossing powders. It's hard to stop once you get going! At this stage, the papers could be used in a number of ways. They would be suited to covering journals or boxes or simply as backgrounds for mixed media. I decided to make a sewn pouch.
 Firstly I used Bondaweb to attach a piece of felt to the back of the fabric paper. If you haven't come accross Bondaweb, It's an adhesive web which is used to bond one piece of fabric to another. It's adhered to the fabric by ironing. Once the felt and fabric paper were fused together, I cut out a simple rectangle  and rounded off one end, using a round dish as a template.......
I then brought up the bottom edge and stitched along the sides to form  the pouch. I used a very close zig zag stitch, with a co-ordinating thread......
Here is the finished pouch, it measures around 7"x 5". I've used a length of machine worked metallic cord as a fastening.........
Hard to believe it's made of brown paper ! Because the fabric paper is bonded to the felt, it feels quite substantial. The great thing is that I've got two more pieces to use up Hmmmm! I feel a journal coming on .......x

Tuesday, 6 March 2018

Winners of Off to Collage

Hello and welcome back ! We're back to announce the winner and top for the Off to Collage challenge. There were some truly fantastic projects but there can only be one winner.....


Congratulations ! We thought your piece really hit the challenge theme on the head ! Please email carringtons22@yahoo.co.uk for the details of your guest post and your winners badge. 

Now on to the top 3:

 Valerie-Jael


 Sue


 Nate


 Congratulations everyone ! Please email carringtons22@yahoo.co.uk for your top 3 badge.

You still have plenty of time to join in with the current challenge Wax Lyrical.


Thursday, 1 March 2018

Wax Lyrical !

Hello ! It's Sue here and I am your host for this month's challenge. I have long been fascinated with the subject of Encaustic Art, melting wax to create many layers and trapping pieces of fibres and papers between the layers of melted wax just seems magical to me. So for this challenge I want to see some wax on your projects, whether it's just dribbled, melted and then stamped into or a wax embellishment as long as you include some stamping or stencilling the choice is yours !

The team have created some fantastic projects to get you inspired ! 

Sue


Cec


Ruth


Now it's over to you !