Thursday 28 May 2015

Altering Found Objects

Hi Julia here with this weeks inspiration post. I love finding objects which others have no further use for and giving them a new lease of life. My post shows step by step (as far as possible!) how I have transformed my latest find. I have mainly used DecoArt products but you can substitute any similar products you have in your collection. I love to incorporate a variety of techniques when creating so please scroll down to see how developed this piece. I should warn you that this post is photo heavy in order to show most steps and supporting close ups!


My purchase from a charity shop which is in dire need of a makeover!


A good price for a useful object even if it needs some tlc!


The final piece - a notepad holder - which is a far cry from the original. I should add that I don't think this photo does the piece justice. Make your own mind up when you've seen the close up shots.


The entire piece is given two coats of gesso with some light sanding in between.


Die cut some shapes from scrap card and trim as necessary.

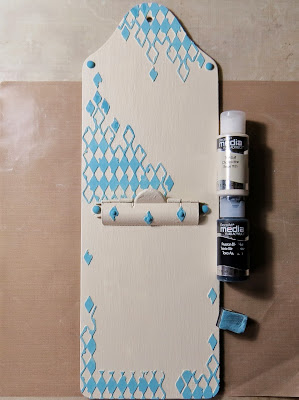
Glue die cuts into position. I decided not to attach any to the area below where the notepad goes as it may make writing more difficult. I drew a pencil line around the pad so I knew where to avoid anything other than flat decoration.

To make 'stud' style embellishments add 'googly' eyes and half pearls.

Paint everything in your chosen colour then add colour to the die cut sections.

Add stamping using archival ink - you don't need to be too particular! 

Detail shot to show stamped images.

Use a pen lid and acrylic paint to stamp circles over the previous stamping. 

Detail shot of pen lid stamping.

When stamping with paint, always brush the paint thinly onto your craft mat and tap the stamp into the paint. Remember to clean the paint off a rubber/clear stamp before it dries.

Add stencilling and 'stamping' (using the top of a pen) as required.

Detail shot to show stencilling and small dots made by the top of a pen.

Add crackle glaze to all the red stencilling and stamping. Also apply to the die cut pieces and 'studs'.

Detail shot to show dry crackle glaze.

Antique the crackle glaze by rubbing in some acrylic paint and wiping back with a baby wipe. Dry brush some metallic gold paint over some of the crackle glazed areas. When dry brushing always add paint to a dry brush and wipe most of it off onto a scrap of paper/tissue and apply using light strokes in all directions. If the brush is too loaded with paint the effect will not work. Build up layers gradually to enable the previous layers to show through.

Add layers of stamping using a chalky paint and when dry, cover with background paint to blend into the design. Do this several times to build up layers. 

Detail shot to show layers. Note the diagonal line across the centre of the shot. This was made using a credit card and some chalk paint then layer upon layer of translucent paint are added. The final stamping with the chalky paint has only been partially covered with translucent paint.

Use layers of Burnt Umber paint and the dry brushing technique to build up an aged look. In this shot you can see the dry brushing being built up around the diamond plate.

Detail shot to show layers of dry brushing built up around the die cuts. The metallic paint adds a warm tone to crackled areas too.

More detail showing dry brushing with both burnt umber and metallic gold. Note gold layers on the 'stud' and the clip.

The diamond shape is cut from foam board. Use a knife to carve out notches. Make faux screw shapes with a sharp knife. Paint the background and stamp as before. Stencil using acrylic paint and chalky paint. Apply crackle glaze. Age with a thin layer of Quinacridone gold paint.

Detail shot to show faux 'screw' and carved notches. 

Detail showing stencilling, stamping, crackle glaze and ageing layers of paint.

Use metallic gold paint and a sponge to finish the edges of the holder. Apologies the focus is not clear over all the photo!

Allow the sponged paint to overlap onto the top surface to give a 'gilded' edged finish.

The notepad holder already has a hole for hanging it on the wall. I have decided to thread a double length of jute string through this hole to hang the holder with.

Detail shot.

Detail shot.

Detail shot.

I do hope this post gives you an insight into how I alter and transform a found piece. I get great satisfaction from working on projects like this, even if I'm often not sure about where I'm headed until I get there! Many of you already make such projects but if all this is new to you, then why not have a go? It becomes addictive!


Thursday 21 May 2015

Welcome today's Guest Designer, Esther!

Hi, today we're welcoming back the winner of our first challenge, Esther of Crafty Effusions  We loved the stamped mosaic panel that she created for our first challenge and are so happy she's back with us today, having created another wonderful piece for our inspiration post. I'm sure you'll give Esther a warm welcome, so let's hear a little bit more about her before she shares what she's created with you. 

I'm Esther and I've been crafting in one form or another since I was a child! I discovered stamping in about 1998 and haven't looked back - I love anything messy and arty and have recently started dabbling with mixed media. It was very exciting to be chosen as the challenge winner and guest designer and I've created a wall plaque of ATCs for the 'Three of a Kind' challenge. 


Materials used -

Playing cards
Gesso
Dye Inks
Stazon ink
Stamps, Stencils
Embossing paste
Background board, Sticky back canvas
Self adhesive fun foam (for attaching ATCs)


1. start with old playing cards and a chipboard base. 


2. Apply gesso with a pallet knife - this gives more texture than a brush


3. Once gesso is dry spray with ink sprays.  I did more cards than I needed until this point as I usually have at least a couple that I don't like much and then  I can choose the best ones for the next stages. 


4. Stamp ! I've used two background stamps on each ATC - one in white acrylic paint and one in a dark Stazon ink 


5. Use a stencil to apply texture - I've used grunge paste on two of my cards and glitter paste on the other Once the embossing/texture past is dry I've coloured the hearts with the dye inks previously used and added some silver Treasure Gold to the stars.
6. Add quotes - I've stamped onto a plain page from an old book and edged with stazon ink (forgot to take a photo of this stage)
7. Once everything was dry and stuck I've added Stickles glitter glue around the edges for a touch of bling ! (again forgot photo)


8.  I prepared the board by applying sticky back canvas which I've stamped with stazon and splattered on with the same dye inks I used on the ATCs 


9. I've stuck the ATCs onto sticky back fun foam to add some depth and then mounted onto the background board (you could use foam tape, silicon glue or just stick flat with double sided tape) 

A huge thank you to Esther for joining us today, I'm sure you'll agree she's created a beautiful trio of ATCs. 
Feeling inspired?...You have till June 3rd to join in with our current challenge 'Three of  a Kind'.

Thursday 14 May 2015

Triple Embossing

Hi everyone, I'm Yvonne and its my turn to share an inspirational post with you.
as our current challenge is Three of a Kind,   I decided to re-visit a technique many of you will know,
Triple Embossing. Then use some  the pieces I made  later in this post as
another example for the  current challenge.


On the left are some of  the main ingredients you will need. Embossing powder,Versa Mark, tweezers, some die cut shapes, I used and old cardboard box, as you do need at bit of thickness to the base. 
A heat gun and a heat mat.


Either press the shape you are using into the  VersaMark pad or stamp all over it,  cover with embossing powder and heat, remember to use the tweezers. While still hot sprinkle again with the power and re heat.
this image is how mine looked after 2 layers.

Add a third layer of powder, while it is still hot,  BUT,  do not heat it yet if you want to add some detail


It gets a bit tricky now, you have to have your stamp ready to use on the table and inked up. I usually use Stazon ink or Archival.
Heat the shape until it is molten, lay it onto your mat then quickly press  the stamp on to the shape.


It does stick to the stamp, just ease it gently away when it cools.


This is the end result. If you are not happy with the result, just reheat it all and stamp again, it will change the colour depending on what ink you used.


On my sample card I left some of the flowers plain, with just the three layers, but with the addition of a sprinkle of another colour embossing powder just before heating.


Whilst having all the tools to hand I also made some word tiles using the same method
Then used the tiles  to add detail,  to a set of cards  with   Ruth's current  
Challenge theme of Three of a kind  in mind.
Using the same main  stamp image [Inspired by Banksy from  Bee Crafty] ,and  embossing folder for all three cards.


Thank you for visiting and I do hope you will join in the fun at Stamps and Stencils.

Tuesday 12 May 2015

Winner and Top 3 - Anything Goes !

Hello and welcome ! Today I'm back to share the winner and top 3 for the Anything Goes challenge. Wow, we were blown away by the number of entries ! Thank you so much for joining us on this journey. It was really tough to pick just one winner, but we managed it in the end ! So, without further ado let's move on and share who the winner is: 


Congratulations Esther ! Your project is fabulous and we loved the different tiles and the texture you've created. As the chosen winner Esther has been invited to Guest Design for Stamps and Stencils at a future date.


Now on to the Top 3:


Congratulations everyone, please email carringtons22@yahoo.co.uk for your top 3 badge. 

All of the winners will also be pinned on the Stamps and Stencils Pinterest Board too ! 

The current challenge is Three of a Kind and you've still got plenty of time to join in. 

Sue