Thursday, 28 July 2016

going with the flow and brushos or infusions?

Hello there! How are you? Its Rachel here today with a little inspiration hopefully! I started my piece today by comparing brushos and infusions - I have both and wanted to see how they worked under the same conditions. Throughout I used yellow brusho and compared it with golden sands infusions. Here are my results:


In this one I sprinkled both onto water colour card and spritzed with water. I think this one clearly shows the coarser nature of the infusions - and also the more multifaceted the colours are. The brushos seem more homogeneous in colour and finer in size and brighter too.


In this next one I sprinkled them onto a craft mat, spritzed with water then used as a wash. Again the infusions differed because of the mixture of colour and grainsize included. 

In this next one I layed down a stencil and sprinkled the crystals on top - then I spritzed with water. Both showed the stencil well but the infusions - because of the coarse nature - flowed less and seemed to define the stencil more clearly.


Finally I swapped the stencils around, cleaned then up, sprinkled through again but this time rubbed grungepaste through the stencil on top of the brushos/infusions ... here the colour of the infusions came through more strongly but in both cases the colour was streaky.

Having done this I decided to make a canvas following the tic tac toe theme from this month - I started using the infusions with the grunge paste. I chose two different colours this time.


I made a cardinal error here mixing blue and yellow and of course achieving murk!!! Still all was not lost and I decided to go with the flow. I wanted to use the line lace, corrugated board and flowers ... so next I added the lace and card.


Next came the flowers ...


Then I added gesso - just a light covering ...


And then used a couple of spray inks.... brushed corduroy and salty ocean...


Finally I added a picture from Indigo Blu ..


I touched up the picture with blue to match ...


So there you have it - I think brushos and infusions are very similar but do have significant differences and produce different effects according to the techniques used with them. The infusions are coarser and tend to produce a more distressed and vintage effect. The brushos are finer and brighter.

I hope you have enjoyed my experiments!

Big Hugs

Rachel xx


Thursday, 21 July 2016

A little bit more Tic Tac Toe !

Hello ! It's Sue here to share an Inspirational Post with you today and I decided to choose another line from the Tic Tac Toe grid for the current challenge. Just to refresh your memory this is what the grid looks like:


Having already used the middle horizontal line I decided go diagonally for this project and use an image, circles (lots of them!) and some lace.


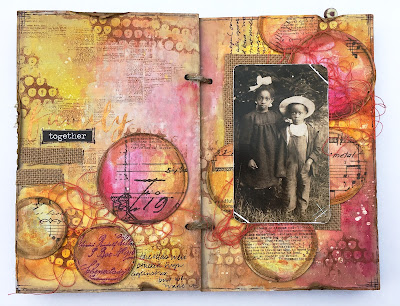
 I made this journal some time ago and have not completed anything in it and as it's A3, when it's a double spread, I thought this would be a good size to go mad with circles ! After the initial base layer of Gesso I've used a Donna Downey stencil and stencilled all of the circles with Stone Fresco Finish paint.


 I then started to fill in some of the circles, my initial thought was to just do a select few, but ....


Once I got started I got carried away ! I've used Fresco Finish paints for all of the stencilled circles. 


 Blending the different shades in the colour families. For the small circles I've just stencilled with one colour but made sure they bump into neighbouring colours.


I then took a baby wipe and some Tikka Fresco Finish paint and wiped it over the whole spread. This gets rid of any white that's left and also blends all of the colours together.


I was tempted to leave it there as I loved the effect of all the circles, but I decided to knock some of them back using Gesso, spreading it over the pages with my finger. I did some stencilling on the opposite corners then took the gold Slick Stix and drew roughly around the opposite corners and a little down the centre then blended the colour out using a baby wipe.


 More stencilling, but keeping the centre area clear.


I wanted to bring some of the circles through from the background to the foreground so mixed some Whipped Spackle with Chocolate Pudding Fresco Finish paint, replaced the Donna Downey stencil and lined it up with the original stencilled circles. I then spread the Whipped Spackle mix over the stencil. Some stamping was done using a Tim Holtz stamp and second generation stamping, then using a Tim Holtz script stamp I did some white embossing.


 To frame the pages a little more I used a brown Slick Stix and again scribbled around the edges and a little in the centre and blended the colour using a baby wipe. 


The sentiment I've used is by Yvonne Blair and it fitted perfectly into this large circle ! The small buttlerflies are by Prima and I've painted them with Fresco Finish paints. 


 For my image, I started by covering a piece of mountboard with Tim Holtz tissue wrap, covering it with Glue 'n' Seal and while it was still wet sprinkling Infusions over the top. I spritzed lightly with water then dried it off.


The image itself is a Tim Holtz stamp, stamped with black Archival onto the Infusions piece then cut out. I also stamped the butterfly directly onto the page as the anttenae are impossible to cut out, I then glued the butterfly over the top. I've used a black Stabilo pencil to draw around the butterfly and with a damp paint brush blend it out to create a shadow and also a dribble down the page. I've also used the Stabilo pencil to draw around some of the larger circles them blended it out and to finish them added some white dots using a white Sharpie pen.


For the lace option I've used a small piece to mount the second little butterfly onto.  


If you've made it to the end you now deserve your cuppa ! This is the finished page and I really love it, I hope you do to !

You still have plenty of time to play Tic Tac Toe with us and I hope today's project has provided a little bit mor inspiration.


Thursday, 14 July 2016

Artist Trading Blocks

It is Cec here and it is my turn to provide you with a little inspiration.  I decided to make some Artist Trading Blocks with a love theme and work them into a tower.


I was given the actual Artist Trading Blocks by Linda Coughlin of The Funkie Junkie Boutique and they are cut with an Eileen Hull die from chipboard.  For this project I used three sizes and you need two of each size.  The score marks are part of the die and I added Scor Tape on the outside of each of the narrow edges.  The two pieces are then joined together to form a block or cube.


Using Mod Podge I adhered torn pieces of old book paper to all sides of each block.


The next step was to coat each block with Gesso.


I used some Golden Light Molding Paste through a Prima flourish stencil to add some texture on one side of each block and then repeated the process using a Wendy Vecchi stencil called Checkmate on another face of each block.


Next I painted the blocks with some Fresco Finish Blush followed by some Fresco Finish Candy Floss that was wiped back a bit with a baby wipe.


I decided at this point that the other two faces of each block needed some texture so I added thread to one and crumpled up pink tissue to the other.


Next I sprayed each block with a variety of spray inks in this order:

Tim Holtz Worn Lipstick Distress Spray Stain
Dylusions Bubblegum Pink
Tim Holtz Barn Door Distress Spray Stain
Lindy's Starburst Frozen Jack Frost
Tim Holtz Hickory Smoke Distress Spray Stain
Tim Holtz Brushed Pewter Distress Spray Stain

I painted some tiny wooden blocks with the Fresco Finish paints to act as feet and then glued all the pieces together before I added embellishments.


I started to work on some decorations next.  First I altered a couple metal charms and a medallion by painting them with Deco Art Media Paynes Grey and then rubbing some Treasure Pewter on them.  The little hearts on the crown were then coloured with a Copic marker and I added a brad from Making Memories to the floral heart (you can see those touches in the final photos).


Next I dug out a really old swirly heart stamp and used Jet Black Archival Ink to stamp it on a card stock scrap.  I didn't take photos but the next step was to colour the heart with Wendy Vecchi's Red Geranium Archival Ink and then coat it with Tim Holtz Clear Rock Candy Distress Crackle Paint.


I created a little finial for the top by mounting a small shank button on top of a large bead and then adding them to the medallion.

I used Jet Black Archival Ink to stamp some text from a set from Stampabilities called Everyday Expressions and then cut them into strips, distressed the edges and inked them with Hickory Smoke Distress Ink.

I painted a resin butterfly with some Folk Art Rose Shimmer metallic acrylic paint and then collected a variety of lace, buttons, burlap string, ric rac and flowers for additional embellishments.  Each side of each block has some sort of embellishment.


Here are final photos of the tower.  If they look like they are tilted it isn't the tower, it was the photographer - LOL.

Artist Trading Block are so much fun to make and can be used alone or in sets as I have done this time.  They can be adorned in almost any style from cute to shabby to vintage to grungy.  I hope I have inspired you to give this a go - it is a great way to practice techniques and also to use up bits and pieces from your stash.

Tuesday, 12 July 2016

Winners - Floral Frenzy

Hello ! It's that time again to announce the winners of the last challenge, which was Floral Frenzy. We had so many beautiful entries which always makes it really hard for the DT to choose a winner, but as always a choice has been made.

Congratulations Avril


We loved these beautiful flowers and the 3D effect. Avril please email carringtons22@yahoo.co.uk for details of your Guest Designer spot and winners badge.

 Now on to the top 3:


 Alison 


Congratulations everyone ! Please email carringtons22@yahoo.co.uk for your top 3 badge. 
All of the winners will also be pinned on the Stamps and Stencils Pinterest Board! 
 
The current challenge is Tic Tac Toe and you've still got plenty of time to share your projects with us.


Thursday, 7 July 2016

Tic Tac Toe

Hi Everybody ! It's Toni here with a new Stamps and Stencils challenge. This month, I thought I'd treat you all to a game of  Tic Tac Toe. If you haven't played along with this type of challenge before, you simply choose three elements from one of the lines in the grid shown below, in either a horizontal, vertical or diagonal direction and use them them in your project. You can include other mixed media elements but please make sure that you include some stamping or stenciling or both ! Let us know which line you have chosen. I've used the top line of 'flowers, corrugated card and lace' on my project I think you'll agree that the design team have put together some fabulous projects which I'm sure will inspire you. I can't wait to see what you come up with !


Ruth


SewPaperPaint

Now it's over to you ! Remember the winner will be invited to join us as Guest Designer and both the winner and top 3 will be added to our Pinterest page.