Boys and girls, please be seated and let's begin today's lesson. Mrs. Clark of SewPaperPaint joining you with today's lecture. Technique school is now in session.
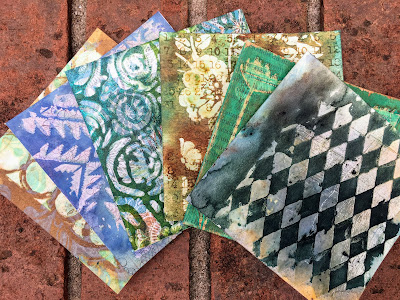
The subject of today's discussion is transparent gels. Transparent gels can be found in a number of forms. For this lesson, I've used IndigoBlu Ultra Thick Slap-It-On. There are many many other forms, such as gel medium, clear crackle paste, clear texture paste, and even clear embossing would work for this experiment.
I have chosen a number of substrates to test how each would show through the clear paste. I applied the Slap-It-On gel with a palette knife through a variety of stencils. The papers were coated with clear gesso before stenciling.
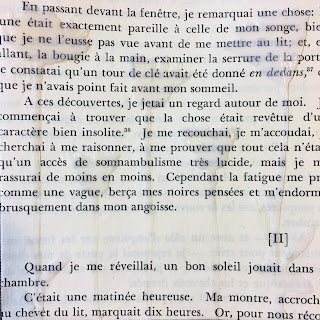
Substrate no. 1: Book Pages
Substrate no. 2: Small Repeating Pattern
Substrate no. 3: Distress Ink Background with Stamping in Archival Ink (Darkroom Door Stamp)
Substrate no. 4: Distress Oxide Background
Substrate no. 5: Distress Ink Background with Distress Oxide Stamping (Darkroom Door Stamp)
Substrate no. 6: Busy Patterned Paper (Could substitute gelli printed paper here.)
Next, I experimented with a variety of tints to test their reaction to the gel and substrate.
Overlay no. 1: DecoArt Fluid Acrylic - (Stencil by Darkroom Door)
Observation: The Blue Green Light acrylic was dried completely and adhered to the gel. It could not be wiped with a wet cloth. Sanding was required to regain transparency. Raw Umber acrylic was applied and burnished while wet with a more satisfying result.
Overlay no. 2: Distress Oxides (Stencil by Balzer Designs)
Observation: The gel partially resisted the Oxides, but some of the cloudiness from the oxide dried on the gel, particularly with the lighter color.
Overlay no. 3: Distress Inks
Observation: The archival ink stamping remained vibrant. A darker application of inks was required for contrast. A complete resist formed.
Overlay no. 4: Infusions (Stencil by Tim Holtz)
Observation: The pigment granules rested on the gel beautifully. The watered pigment dried in a very matte finish, creating a beautiful contrast.
Overlay no. 5: Lindy's Stamp Gang Magicals (Stencil by Tim Holtz)
Observation: The Distress Oxide Stamping muddled beneath the gel, however it remained in tact beneath the Magicals and the oxidation showed through, with a complete color variation.
Overlay no. 6: Lindy's Stamp Gang Sprays (Stencil by Joggles)
Observation: Green matte spray and blue pearlescent spray were used. The matte finish sprays created a complete resist, but the pearlescent sprays tinted the gel.
Before and After Shots:
Your homework assignment is to participate in our Technique School challenge. This month we want you to play teacher and share a favorite process or new experiment. Document your findings with at least one process photo. We can't wait to see your technique tutorials and new ideas! Remember to use stamps or stencils or both!
I've created a pinnable image for you convenience.
Class is dismissed!


These backgrounds have turned out amazing !
ReplyDeleteWOW Autumn, thank you for the lesson. Totally love seeing each of the result. I learn something new today.
ReplyDeleteVery ,very interesting Autumn! I think i will have to do a bit of experimentation myself!!
ReplyDeleteYour trials came out beautifully! Can't quite pick a favorite as I love them all!!
Thanks so much for this!
Jackie xx
Everything turned out beautifully !
ReplyDeleteOh, Autumn, I have to try this!! It looks so great! I love everything you make. Sure wish you lived close so I could see it all in person. I love the texture you put into your creations.
ReplyDeleteThis is such a great Technique School Autumn, I am bookmarking it for future reference - thanks so much for sharing! Anne xx
ReplyDeleteBest day at school ever! What a fun class and outstanding results. Especially love the 3rd and 4th pieces. Running off to play now. Thanks for the fascinating lesson.
ReplyDeleteAutumn, thanks for sharing these techniques. I can't wait to try!
ReplyDeleteThank you teacher! Great technique school with such interesting results! Each so different and wonderful to have them side by side too! Pinned for future reference!
ReplyDeleteGreat experiments! I really like the harlequin stencil over the Distress Oxide background. I must get some of that stuff! I totally fell in love with that background!
ReplyDeleteSuch a great Technique School Autumn, love it!!!
ReplyDeleteHugs, Corinne
Scrumptious techniques and what a lovely set of backgrounds you've now got to play with. Thanks for sharing.
ReplyDeleteAlison x
Autumn, your backgrounds are amazing and looks so fun to create! Thank you for sharing your processes, especially the before and after pics. Love these!! Hugs :-)
ReplyDeleteBeautiful work Autumn ! A very informative and inspirational post ! Xx
ReplyDeleteWhat beautiful backgrounds you created - I've got to go back up and read them again - slowly! Wonderful class Mrs. Clark!
ReplyDeleteFantastic post Autumn ! I love the many experiments you've done, it's great to see the results, definitely a post to have at hand ! Sue C x
ReplyDeleteSuper tutorials and post Autumn!! huge hugs,Jackie
ReplyDeletethis is amazing Autumn - love it!!!
ReplyDeleteStunning, amazing and inspiring results teacher! xxx
ReplyDeleteWonderful wonderful post, Autumn, thanks for sharing this detail tutorial.
ReplyDeleteThis comment has been removed by a blog administrator.
ReplyDeleteWow, what inspiration and fabulous results. Thank you so much for reminding me how diverse and exciting resist techniques can be. Creative hugs, Julie x
ReplyDelete